Summary
The Chronology tool within the Chronology page allows users to build a chronological timeline of events which can be tagged and linked to documents, notes and characters.
If no chronology exists in the workspace, users will need to press Create the first Chronology and follow the on screen instructions before being able to add event entries.

Only one chronology will be available by default. Contact the Solution Operations team if additional chronologies are required.
We've set out how to populate and manage chronology entries below.
More information on how Opus 2 can assist with creating chronologies in bulk can be found here.
Populating the Chronology
Chronology entries can be created in one of three ways:
Within the Chronology
- New Entry - Within the Chronology page, press New Entry to create the entry.
- Populate New Entry - Within the New Entry window, populate the following options as required:
| Entry Option | Description | Additional Information |
|---|---|---|
| Type | Choose the Type value for the event from the dropdown. | Default values: Fact, Meeting, event, Letter or Email. Options are customisable upon request. |
| Date | Choose the Date operator from the dropdown and populate the Date value within the D/M/Y input box. | Conditions applicable: On, Before, After or Range. |
| Status | Choose the Status of the event from the dropdown. | Default values: Disputed or Undisputed. Options are customisable upon request. |
| Time | Choose the Time value and select the relevant Time Zone value from the dropdown. | Default Time Zone: Europe/London |
| Tags | Choose the Document Tag(s) to be applied from the luggage label icon. | N/A |
| Characters | Choose a Character to link to the event entry from the silhouettes icon. | N/A |
| Description | Populate the description to be applied to the event entry within the extended input box. | Rich text formatting can be applied as required. |
| Custom Fields | Populate any Custom Fields that exist to be applied to the event entry within the input box(es). | Custom Fields can be created upon request. Rich text formatting cannot be applied. |
| Sources | Choose document(s) to link to the event entry from the Add a Source button. | Once linked, the sources should show under the Doc. Name and Status headers. To remove a Source, press the X icon to the right of the Source row. |
- Save Entry - Press Save and the event entry should then be viewable in the chronology.

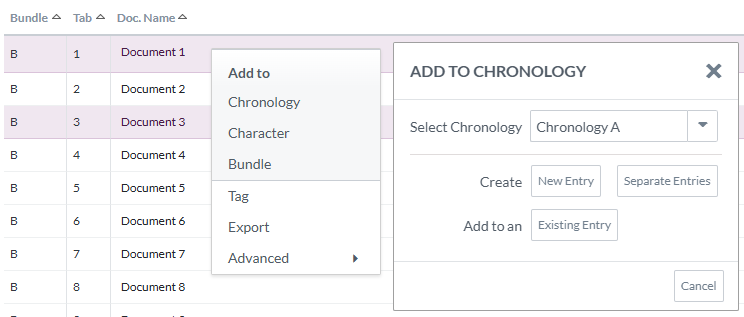
Within the Documents Page
- Select Document(s) to Add- From the Documents page, select the index entry of the document(s) you would like to add to the Chronology:
- Multi Select - On your keyboard hold either CTRL + click to select multiple individual documents or SHIFT + click to select a range of documents.
- Select Add to Chronology Tool - Right click on the selected documents and press Chronology (under the Add To header) from the menu.
- Create or Add to a Chronology Entry - From the Add to Chronology window, use the Select Chronology dropdown to select the relevant Chronology to edit and use one of the two following options to add the documents:
- Create - Press New Entry to create one new entry linked to the document(s) which can be populated on screen or press Seperate Entries to create multiple entries per document selected which will need to be populated from the Chronology page.
- Add to an - Press Existing Entry to add the documents to an existing event entry.
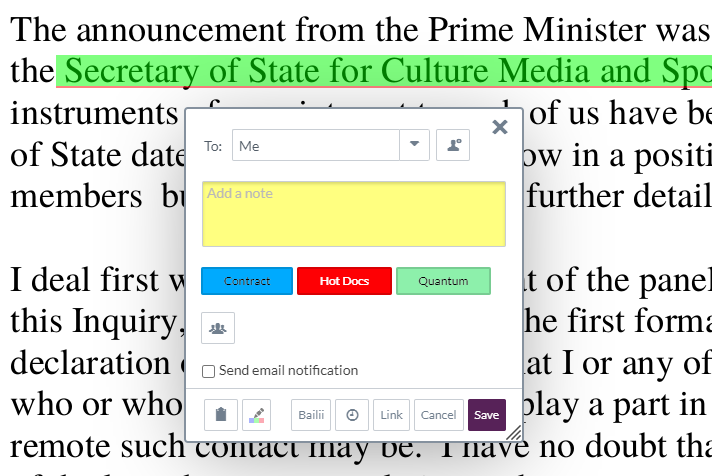
Within a Document
- View a Document - From the Documents page, either double click a document entry or select a document and click into the preview window on the right to open the Document Viewer.
- Create a Note / Annotation - Within the Document Viewer, click and drag over any section of text or area in a document or transcript and the Annotation tool should appear. Populate the note as required.
- Add Chronology Link - Within the Annotation tool, press the Chronology clock icon and use on of the two following options to add the document:
- Create - Press New Entry to create one new entry linked to the document(s) which can be populated on screen.
- Add to an - Press Existing Entry to add the documents to an existing event entry.
Managing the Chronology
- Chronology Entries - Entries can be managed individually or in bulk:
- Individually - Right click on the Chronology entry to open the menu and select:
- Edit - Opens the Edit Entry window, allowing users to edit the contents of an entry.
- Duplicate - Creates a copy of the entry.
- Delete - Permanently deletes the entry.
- Bulk - On your keyboard hold either CTRL + click to select multiple individual documents or SHIFT + click to select a range of document and right click on the highlighted entries to open the menu and select:
- Duplicate Entries - Creates copies of the entries.
- Delete Entries - Permanently deletes the entries.
- Add Tags - Applies Document Tags to the entries.
- Add Sources - Applies hyperlinks from the entries to document(s).
- Set Type - Applies a Type value to the entries.
- Set Status - Applies a Status value to the entries.
- Individually - Right click on the Chronology entry to open the menu and select:
- Page View - The Chronology view can be adjusted as needed from the grey toolbar:
- Change Chronology - If multiple chronologies exist, press the first dropdown detailing the name of the chronology and select the relevant chronology to view.
- Columns - Press Columns dropdown and tick / untick to show / hide the viewable metadata fields applied to the chronology entries and / or applied to the hyperlinked source documents. Press Save to update the default view for the user.

- Reset - Press Reset to reset the view following a filter or search.
- Source Document Thumbnails - Press Tools and tick / untick Show Thumbnails to show / hide the thumbnails of hyperlinks source documents.
- Search - From the grey toolbar, input a keyword or phrase into the Find Chronology entry search bar and the search should automatically run, narrowing the entries displayed and highlighting the matching words in yellow.
- Clear Search - Press the X to the right of the Find Chronology entry search bar to clear the search.
- Filter - From the grey toolbar, press Filter to specify the entries shown, based on different components of the entries.
More information on how to Filter chronologies can be found here.